Company Settings
Adapted from the Pulse Dashboard Administrator Guide (PDF, December 2020).
These settings apply to everyone. They decide what a fiscal year means, which dates the material planning figures are calculated from, how locations are combined, and what a new user's screens look like on their first day.
The fiscal calendar
Administration → Calendar defines the fiscal calendar for the company, and with it every year-to-date and period-to-date figure in Pulse Dashboard.
- Fiscal Year Start — the month your year begins. Used across the reports.
- Production Week Start — the day your production week begins. Used on Production module reports that read Macola® POP and Shop Floor Control data.
A standard 12-period year needs only the starting month. For a 4-4-5 or 13-period calendar, select User Defined Years and enter the start and end dates of each period. Calendar Settings covers what depends on this.
MRP dates
Administration → Tools → MRP is the most consequential screen in this section: it defines the dates Pulse Dashboard treats as demand and replenishment for every item.
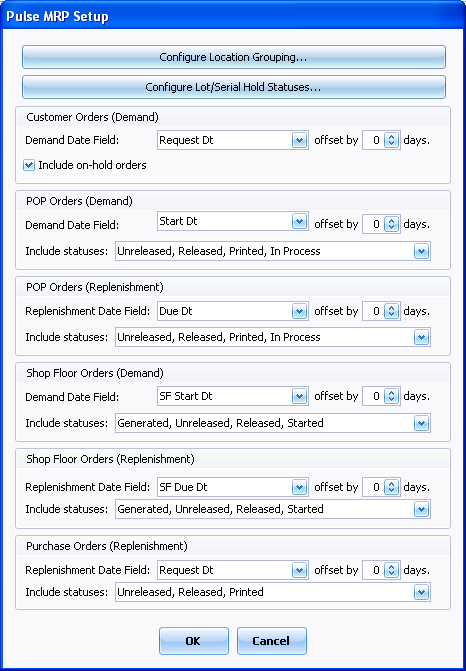
Each order type in your ERP software counts as demand, replenishment, or both:
| Order type | Counts as |
|---|---|
| Customer orders | Demand |
| Purchase orders | Replenishment |
| POP production orders | Both — the parent item replenishes, its components demand |
| Shop floor orders | Both, for the same reason |
For each, three things are set: which of Macola®'s several date fields to plan from, an offset in days that can be positive or negative, and which order statuses to include. On-hold and blanket orders can be included where that applies.
Because Macola® order entry screens carry several date fields, which one to use is a decision to make with customer service, purchasing and production together rather than alone. The settings can be changed at any time with no consequences — nothing is stored from a previous calculation.
This is not Macola®'s MRP
Pulse Dashboard plans from active orders and their next layer of components, and needs almost no setup in the item master or item/location files. There is no Regen to run: refresh a report and the current plan is on screen. Macola®'s own MRP module requires substantial setup and a regeneration that takes minutes to hours, and suits companies planning deep multi-level bills of material. The two are separate calculations, and running one does not disturb the other.
The MRP Setup screen documents every field, and Pinpointing shortages shows what the settings do to the reports.
Location grouping
Reports can show inventory quantity and value for one location, for all locations, or for a group of locations you define. A company with a main plant, a second site and a nearby outside warehouse can read combined on-hand and allocated quantities across all three.
Creating a group is a matter of typing the same Location Group value against each Macola® inventory location; the value can be any descriptive name. Then add the group columns to the reports that need them from the Column Chooser. The same screen decides which locations are included in MRP calculations at all.
Location grouping is reached from the MRP screen above, and applies to reports across Pulse Dashboard rather than only to the Material Requirements module.
Lot and serial hold statuses
Where items carry lot or serial numbers, specific hold reasons in Macola® can be listed here. Lots and serial numbers on those holds are then treated as unavailable everywhere in Pulse Dashboard's calculations, which is what you want when material is quarantined pending inspection.
Inventory usage
A single checkbox decides whether manual inventory issues and receipts — the ones entered through Inventory Transaction Entry — count towards usage calculations.
The screens new users start with
New users begin with a standard set of tabs and reports. If your company has built a better starting point, make it the default:
- Log in as the Pulse Dashboard user whose screens should become the new default.
- Go to Administration → Company Settings → Default Company Settings → Set Current Settings as Default.
- Confirm. Every tab, report, filter, column and sort belonging to that user becomes the default for new users from then on.
Delete Default Settings undoes it. The settings that ship from Leahy Consulting remain available either way, so this is reversible.
Connection and localization
- Settings → Connection holds the server and database the user is attached to. Where a company is licensed for more than one database, changing the server and database names here and clicking OK moves Pulse Dashboard to the other one. An unlicensed combination produces errors. Users are defined per database, so anyone moving between companies needs rights in both — user settings can be exported from one and imported into the other. Pulse Dashboard reopens in whichever database the user last worked in.
- Settings → Localization Settings sets the currency symbol shown for that user, and normally follows the country and language settings of Windows on that workstation.
Data Exclusions and Override Tables also live on the Settings menu. Both are advanced and rarely used; Override Tables appears twice, once under Settings for a single user and once under Administration for all users.
Where to go next
- Users and security — who is allowed to change any of this
- Maintenance and tools — cached data, user profiles, licences and updates
- MRP Setup screen — the field-by-field reference
Tip
Need a hand? The PULSE support team is happy to help — call (513) 723-8095 or email [email protected]. The MRP date settings are worth a call before you change them, because they move every planning number on the site.