Setting Up the Report Scheduler
Adapted from the Pulse Dashboard Scheduler installation and operating instructions (PDF, November 2024).
The Scheduler emails Pulse Dashboard reports on a schedule, and it will filter the same report differently for each recipient — every salesperson gets the sales report showing their own customers, without anyone building nine reports. Once the groundwork is done, a new job takes minutes.
Three conditions before you begin
- Pulse Dashboard has to be running on a server or workstation with an open session. The Scheduler reads report definitions from that session; with Pulse Dashboard closed, no emails go out.
- The Scheduler needs a user of its own. Running it blanks out all other dashboards for whichever user it runs as, testing included, so create a dedicated account for it.
- Your email service has to support SMTP.
Create the Scheduler's user
- In Pulse Dashboard, click User Control.
- Click the arrow beside Add and choose Manual Entry.
- Enter the domain and the new username, then click Add.
- Give the user Publisher and Admin rights.
- Authorize it for all modules.
Users and security covers what those rights mean elsewhere in the software.
Decide where the files land
Create a folder on the computer where the exported reports should be written. The Scheduler writes a file for each report as well as emailing it, so this folder is the record of what went out.
Save and share what you want sent
The Scheduler sends what has been saved and shared, and what you choose to save decides the shape of the email:
| What you save and share | What arrives |
|---|---|
| A report | That one report |
| A tab | Every report on the tab |
| A dashboard | Every report from every module and tab on it |
- Go to the report or tab.
- Right-click the header and choose Save and Share Report (or Tab).
- Enter the folder name that will hold your scheduled reports.
- Share with Everyone.
- Click Save.
If Pulse Dashboard offers to create the folder — "The folder '\Scheduled Reports\ does not exist. Would you like to create a new folder?" — choose Yes.
Write down the folder and report names exactly
You will type them into the job later, and the job matches on the text. \\Scheduled Reports\Customer Orders Summary is the kind of thing to note down. Confirm what was saved from Administration → Tools → Save and Share Explorer: expand the root, find your folder, and select it to see what is in it.
Enter the SMTP details
Go to Administration → Pulse Scheduler → Email Service Info and enter your SMTP host and its settings. The account you name has to be allowed to send mail through an external SMTP server. Click OK to save.
Setting up and maintaining the SMTP details is the customer's responsibility rather than ours — the mail server belongs to your company or your provider, and its rules change without reference to Pulse Dashboard.
Create the job
Administration → Pulse Scheduler → Edit Jobs, then the green + in the lower left of the Scheduler window. Expand a job with the + sign to see its parts; remove one with the red −. Open a job with Edit Jobs at the top right, or the … beside its name.
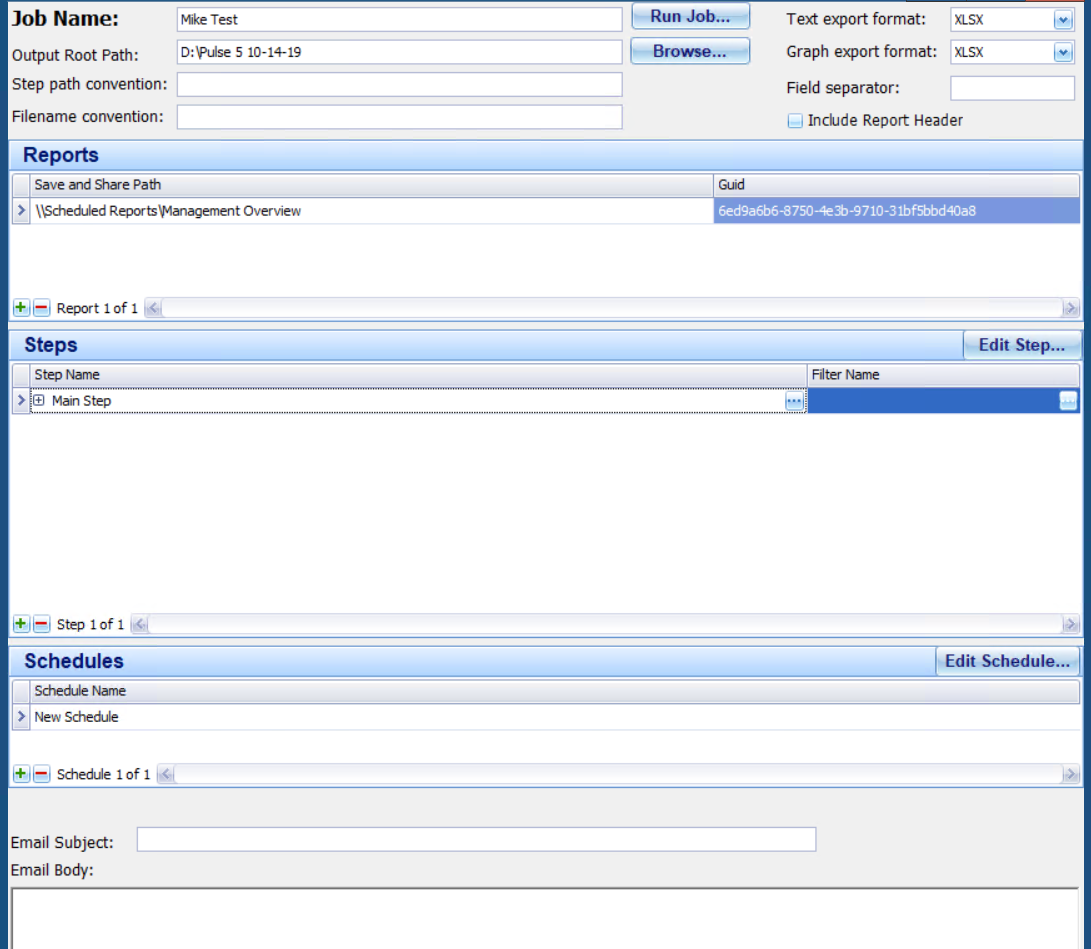
Steps: who gets it, and what they see
Click Edit Step, or the … in the Step Name field.
- Give the step a name that says what it does and who it is for.
- Click the green + in the lower left to add an email recipient.
- To send that recipient only their own data, click Edit beside Pulse Filter, then the green + to add a filter, and choose the field to filter on. Click Save and Share.
- Add a value with the green +, then enter it. Change the ending value to filter on a range instead of one value.
- Click OK to save the filter, then OK to leave the steps. A job can have as many steps as the report or tab needs.
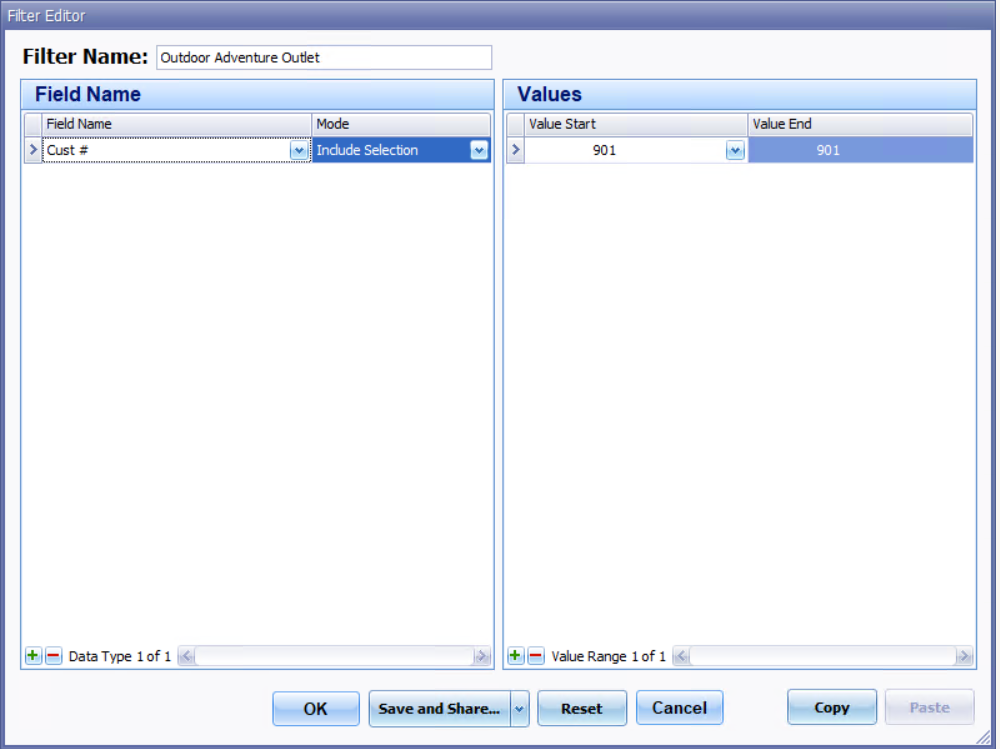
A filtered job still writes empty files
A file is created for every report in the job even when the filter leaves it with no data. Filter a management tab to one customer and you will get an Excel file for the A/P report too — empty. Send tabs whose reports all share the filter you are applying, or expect the empties.
The schedule
Edit Schedule, then:
- Name the schedule.
- Choose the Schedule Type — Recurring, One Time or Immediate.
- Check Enabled. Clearing it is how you stop a job without deleting it.
- For a one-time run, set the date and time.
- For a recurring job, set the frequency; a daily job can run once or several times a day.
- Set the start and end dates.
Each run overwrites the copy in the output folder.
Finish and check
Add the Email Subject and any text for the body at the bottom of the job screen, then click OK. The first time you save a job, Pulse Dashboard asks whether to start the Scheduler now — choose Yes. The lower left of the screen then shows when the job next runs, and reports back when it has finished. Check the output folder to confirm the file was written.
Troubleshooting
| What you see | What to check |
|---|---|
| Files created, but with no values in them | The job's filters — are they valid for every report in the job? |
| "Specified argument was out of the range of valid values. Parameter name: value" | The SMTP settings have not been defined |
| Only some reports from a tab produce files | Clear the Filename convention value and test again |
| No files and no emails at all | The Scheduler is not running on a workstation |
Where to go next
- Users and security — Publisher and Admin rights, and the dedicated account this needs
- Maintenance and tools — Save and Share Explorer, where you confirm what the job will find
- Advanced techniques — building the reports worth scheduling
Tip
Need a hand? The PULSE support team is happy to help — call (513) 723-8095 or email [email protected]. Setting up the first job together is usually a short call, and the SMTP details are the part worth having your IT group on hand for.